Wednesday, May 22, 2024

Scrappy Tails Crafts Daisy Thank You Card

Hello crafty friends! I'm back with another project share featuring Scrappy Tails Crafts. The last day of school quickly approaching so it's time to start thinking of teacher thank you cards and gifts. Gift cards are always my go to choice to give teachers at the end of the year but I wanted to make a pretty card plus matching bookmark to go with it. 

I've made this A6 sized card (4.5" x 6.25") and bookmark using some die sets from Scrappy Tail Crafts.  The Stitched Daisy Blooms and Main Base Book Corner die sets are what you'll need to recreate these samples.  With the Stitched Daisy Blooms die set, you can create three different sized daisy flowers. I have used all three sizes on my card. 


I die cut my daisies and leaves using the Stitched Daisy Blooms dies from white card stock.  I then used blending brushes and the following Catherine Pooler inks to color each layer before assembling: Do-Si-Do for the pink flower petals, Drive In for the blue flower petals, Tiara for the flower centers, Garden Party & Grass Skirt for the leaves. These daisies are so quick and easy to assemble. I decided to double up on the petal layers. I applied the ink heavier on the back layer so there would be some contrast between the two layers.  The "thanks" word die is also included in this set. 

To create the bookmark I used the Main Base Book Corner dies. With this set you can make a base corner bookmark which can then be decorated however you'd like. I simply adhered one of the medium sized daisies onto the bookmark. The recipient can then use the bookmark for a notebook or planner or of course for a reading book too. 


I have one pro tip to leave you with: when adhering the flower layers together, use thin foam adhesive. I suggest a 1mm thick foam adhesive. This gives a little separation between the layers. It makes the flowers appear fuller and more dimensional without adding too much bulk.  I do this when assembling all layered die cut flowers. 


Monday, May 20, 2024

Sunny Studio Beach Scene Birthday Card

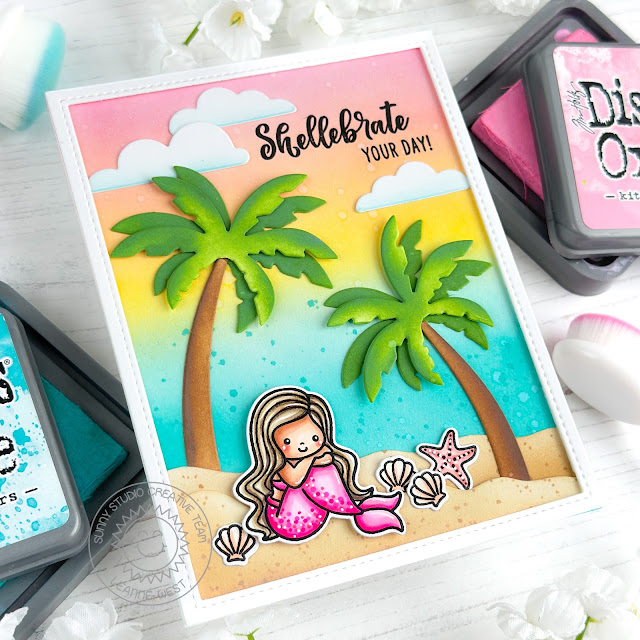
Hi there! I'm sharing all the details how this tropical birthday card came together. I've used the Tropical Trees Backdrop dies to create an idyllic beach scene for my little mermaid. 

I started this card with an ink blended background. I used the following Distress Oxide inks to create the dreamy sunset sky and ocean: Kitsch Flamingo, Saltwater Taffy, Fossilized Amber, Salvaged Patina, and Peacock Feathers. 


Next I die cut the frame, palm trees, beach area, and clouds from white card stock. I then used blending brushes and Distress Oxide inks to color: Vintage Photo for tree trunks, Mowed Lawn for palm leaves, and Antique Linen + Tea Dye for Sand.  Note I did double up on the palms for the tree tops to make them look fuller. 

I Copic colored a mermaid and some shells from the Mermaid Kisses stamp set. I then used the coordinating dies to cut them out. 


I adhered everything in place onto the A2 sized inked background panel. The white frame and mermaid are popped up with foam tape. I also used foam tape to adhere the layers of palms together. This gives a little separation between the two layers and adds to the fullness.  Lastly I stamped the greeting which is included in the Mermaid Kisses set

Copic colors used - mermaid tail: RV02, RV06, RV09, skin color: E00, E11, E13, hair color: E42, E74, E81, shells + starfish: YR01, YR30, R20, R21


Tuesday, May 14, 2024

Scrappy Tails Stacked Books & Flowers Card

Hi everyone! I’m excited to be guest designing for Scrappy Tails Crafts this month. Their newest release includes lots of fun products to create projects with the book lover in mind. Today I’m sharing a birthday card which features a stack of books and pretty floral accents. 


I started with an A2 sized card base and then added a speckled green mat for the background. I used Wicked Elixir Distress Mica Stain to get that fun speckled look. Just a couple quick pumps do the trick. 

I used the Stacked Books with Flowers die set to create a colorful stack of books. I die cut all the pieces from white card stock and then used Copic markers to color each piece before assembling. Below is list of the colors I used:
  • pink - RV91, RV81, RV83, RV85, RV89
  • peach - R00, R20, R21
  • yellow - Y32, Y35
  • green - G20, G43, G46
  • aqua blue - BG10, BG11, BG13
  • shading - W1, W3


Next I die cut the Spring Floral Stem twice from white card stock.  I cut them apart so I'd have a shorter sprigs to tuck behind the book stack. 

Lastly I added a greeting from the Life is a Story stamp set. I stamped it in green and then did a little coloring around the frame area, so the look would be cohesive with the stack of books.


Saturday, May 11, 2024

Honey Bee Stamps It's A Party Birthday Cards

Happy weekend crafty friends! We can never have too many birthday cards on hand and I have an easy to make design to share today which can be replicated in different color combos to suit the recipient. This design features a very festive stenciled background and bold brithday greeting created with products from Honey Bee Stamps


Honey Bee Stamps supplies listed below:
The showstopper of this design is without a doubt the stenciled background. It's very detailed and does take some time to stencil all the layers but so worth it! I also added lots of splatter to my stenciled panels with metallic watercolor paint for a bit of sparkle. 


I used the following Catherine Pooler Ink colors for the stenciling:
  • Garden Party 
  • Tiara 
  • Chiffon
  • Orange Peel 
  • Cummerbund 
  • Party Dress 
  • Do-Si-Do 

I trimmed the stenciled panels down to be a bit smaller than A2 size and matted them. This mat with the tiny de-bossed stars was created with largest die in the Lovely Layouts Party Frames. Next I added the Big Birthday greeting.  This die set includes the letters and shadow.  The letters were die cut twice from plain white card stock and once from white glitter card stock. I adhered all three layers together to give the letters extra thickness and stand out even more from the shadow piece. To finish off this card design, I added some sparkling clear sequins scattered around the background.  

Monday, May 6, 2024

Sunny Studio Strawberry Theme Birthday Card

Hi there! I have a mini slimline card to share which features a row of sweet little strawberries made with the new Strawberry Patch dies from Sunny Studio. I added a birthday sentiment to my card, but this design could be used for many different occasions by switching up the greeting.  


I started by creating an inked and splattered background panel, which is trimmed slightly smaller than my mini slimline card base. I used a light green ink to add some shading around the panel edges which fades going in towards the center.  Next, I stamped the sentiment, from Punny Fruit Greetings, right in the center of this panel. I did this first, so I would know exactly where I could arrange the little blossoms and the row of strawberries.  


I created all the little strawberries and blossoms with the new Strawberry Patch dies. I die cut all the pieces from white card stock. To color I used blending brushes and the following Catherine Pooler inks : Garden Party, Grass Skirt, Spruce, Lemongrass, Rouge, & It's a Girl. After adhering all the strawberries, leaves, and blossoms, I added a few sparking clear sequins and tied some twine around the top of the card to finish. 


Scrappy Tails Crafts Daisy Thank You Card

Hello crafty friends! I'm back with another project share featuring Scrappy Tails Crafts . The last day of school quickly approaching so...