I’m just gonna stop pretending I’m gonna get better at updates.
Got accepted into the 501st as a Jawa and it has been great fun so far! Can’t wait to keep adding to my list of troops.
~Anna


I’m just gonna stop pretending I’m gonna get better at updates.
Got accepted into the 501st as a Jawa and it has been great fun so far! Can’t wait to keep adding to my list of troops.
~Anna
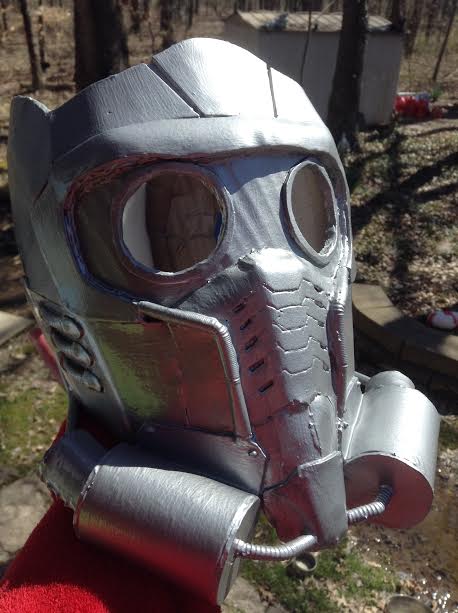
Hello there! This is my quick tutorial on how I made my Star Lord helmet – which I spent a grand total of about $35 on. It’s not the best looking thing out there but you know what? It doesn’t have to be 🙂 It’s my baby and I’m proud of this thing.
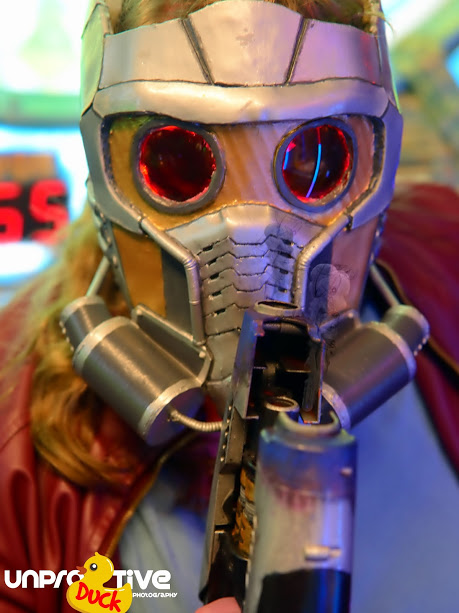
Find unproducktive on instagram – she’s the wonderful photographer behind this shot.
To start, I’ll direct you to this: https://docs.google.com/file/d/0Bx8lCMV_bmHINEdqZnJYLUN5TlU/edit
This is the pdf file I used as a reference more so than an actual base. I had to make a lot of my own pieces and had to edit things to work for me, but this is a good starting place. It definitely helped a lot.
As I usually say, the following list of supplies is merely the things I used, it isn’t necessary for you to use the same 🙂 Also, I won’t include things like hot glue, cutting and tracing utensils.
Supplies:
With your materials assembled, it’s time to begin on this expansive project. Give yourself time, allow yourself patience, and always remember that you can always fix things – especially when it comes to painting! It’s not the end of the world if you make mistakes, I know I made some.
Method:
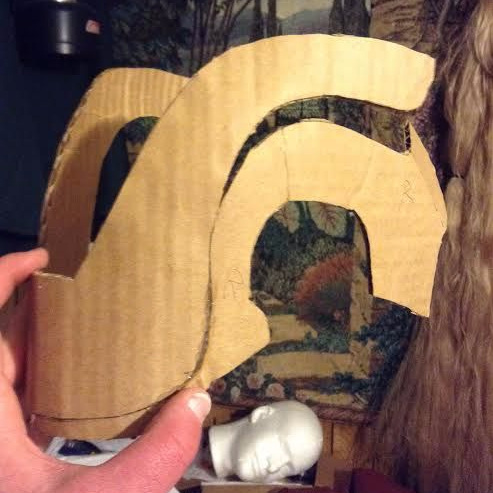
Patterning and tracing!
Of course the first step will be to have all of your pieces traced and cut out from your cardboard. If you use the pdf file I provided above, know that following its exact patterning doesn’t necessarily work as some of the pieces don’t fit exactly. I found that out when I did a paper mock up of just the pattern provided. It was then I began massively editing things to fit better and look how I wanted them to.
It is during this time that you may consider scaling if you think it’ll be too big or too small. I thought I had a big head and this fit a bit big before I put the foam padding in. So a mock up is recommended.
I also definitely recommend having reference images on hand so as to make it easier for you to understand how things fit together. You think it would be easy but I turned myself around quite a bit.
Also make sure to label everything! Very important.
And another note, having all your parts cut out from cardboard, trace every piece onto craft foam so that things will match up later 🙂
Putting the pieces together!
Having everything cut out and ready to go, it’s time to begin putting it all together. This can prove to be a tricky process depending on the glues you use. I’m cheap and old fashioned so I just used hot glue. This or course means that my helmet can not be left in a hot car or it’ll begin melting, but I’m okay with that.
The back of the helmet is born!
Make sure to bend pieces where they need to be bent, and of course glue seams together on individual parts before putting them with other pieces. If you’re using hot glue, anticipate getting burned. I got burned A LOT.

We have a very basic base! WAHOO!
HAVE PATIENCE. If you get frustrated, you’re only doing yourself a disservice and are going to make this process way more challenging. Take things one step at a time and try to have fun doing it 🙂 You’re making Star Lord’s helmet! This is fun!
Layering!
I’m impatient to a point in that I like to do multiple things as I’m building. This being said, it means that I started layering on foam on top of the cardboard. Partly, this was to ensure that everything was fitting together well.
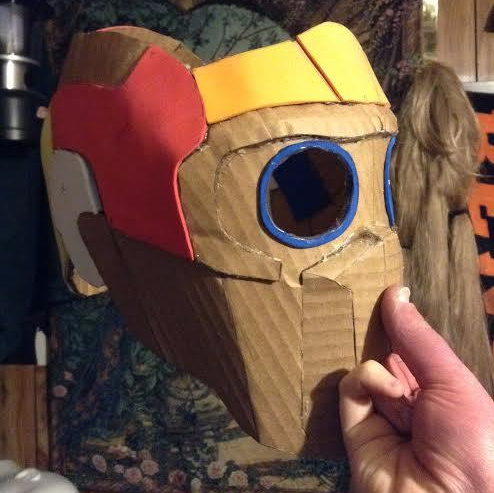
Get foamy with it.
By now things should start taking shape as you slowly begin bringing this helmet to life 🙂
Make sure the lenses from the sunglasses fit!
Keep on building, keep on building, keep on building, building, building…
So colorful! Also, I will note here that I actually cut 3/4 of the way through the foam to make the lines on the front more prominent. I also cut out the little rectangle pieces for detail reasons.
If you’re like me, you’re getting more hyped as this helmet comes along. Even in the unfinished stages, I would just walk around my house with it on. EXCITEMENT!!!
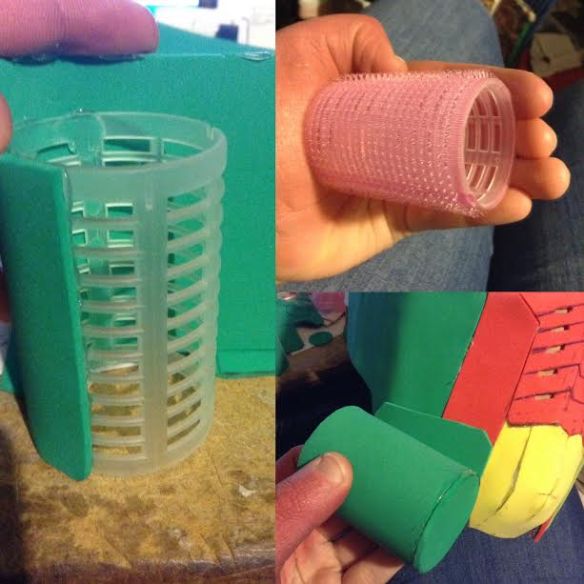
Showing my little trick of using dollar store hair rollers to accomplish the look I wanted. Life hacks.
A lot of this build can be personalized to suit your preferences on what you would like this helmet to come out looking like. You can size things different or follow the original blueprint more acutely. Whatever you want!
Straws make for lovely details 😀
Sealing it up!
Time to coat everything in modge podge or whatever sealing method you’re going to do. I wanted a brushed appearance on my helmet once it was painted up, so I did about 6 coats of modge podge over everything – some places more sparingly – to make sure everything was sealed and ready to go. This is an important step, as unsealed foam will look more like leather when painted.
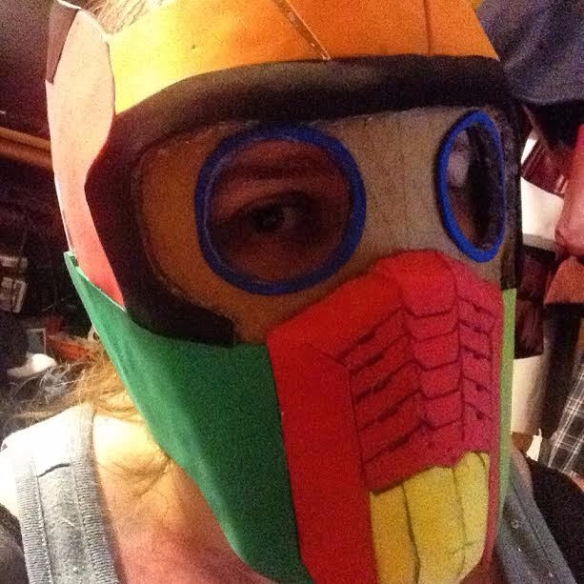
Painting!
My favorite step, as it brings all the little things together and really just makes me happy. It’s the time to see a real glimpse of your finished product and it’s oh so exciting!
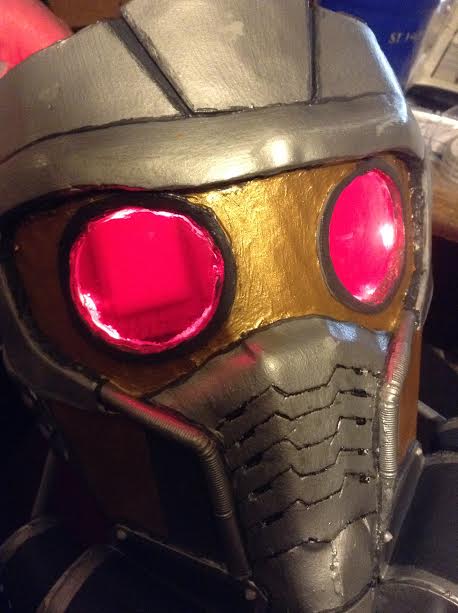
The effects of the hammered silver 🙂 Also, the only place I didn’t layer foam is clearly visible around the eyes. I kinda regret this but kinda don’t. It gives it texture.
-throws in gold-
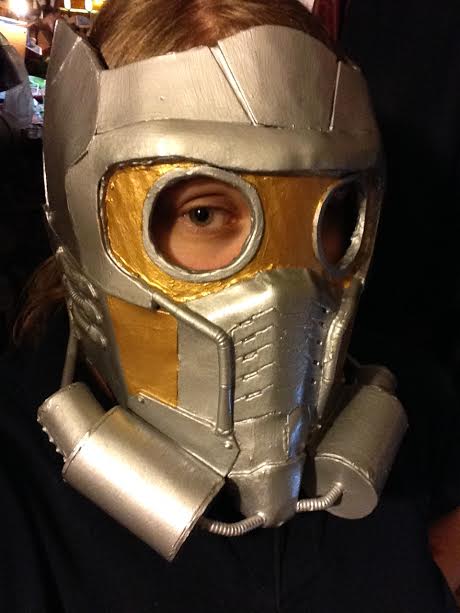
So shine, much excite.
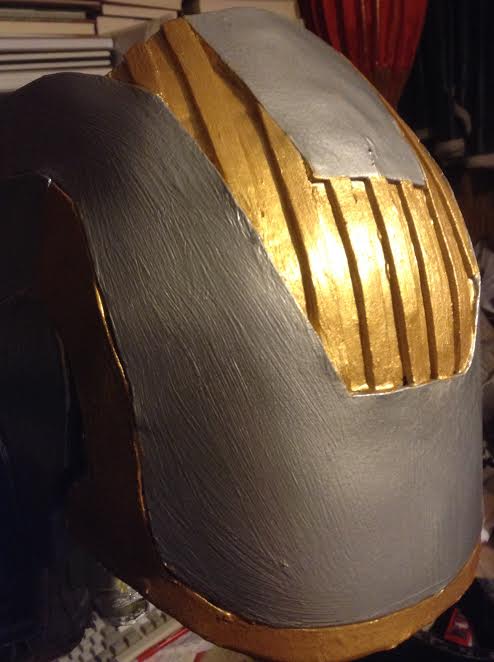
A view of the back – also vastly different from the blueprint version. This also lets you see the brushed metal appearance I went for.
-insert happy dance and excited screeching-
Gold paint added, dark gray and light gray added to give more detail. Also some black detailing thrown in just because.
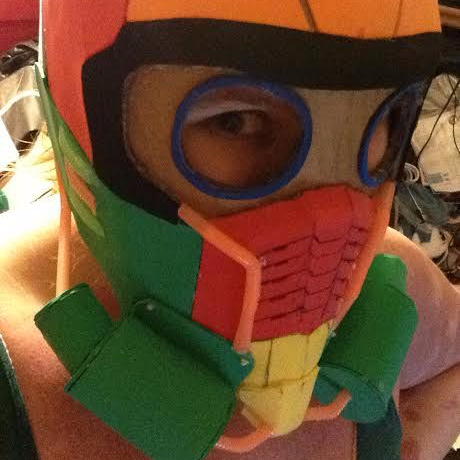
It’s getting super close! The excitement is mounting and at this point I was getting real ready to have it completed. The last few steps are going to be a struggle to keep calm for.
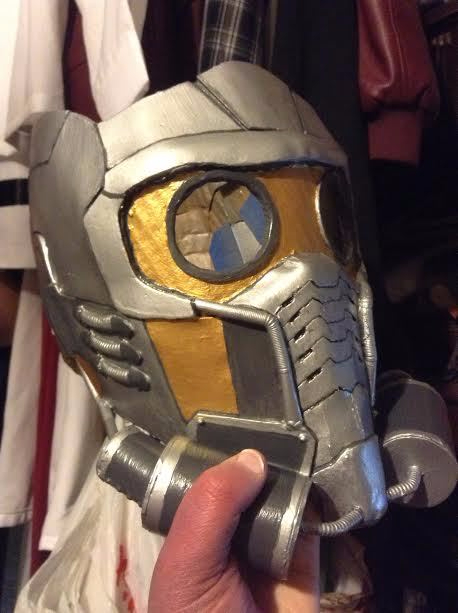
Lights and Lenses!
Something important to note here is that before you put in the lenses and lights, you should probably clear coat the paint to make sure it’s all sealed and extra shiny. I skipped this and haven’t clear coated any of it. I should have and may yet. We’ll see.
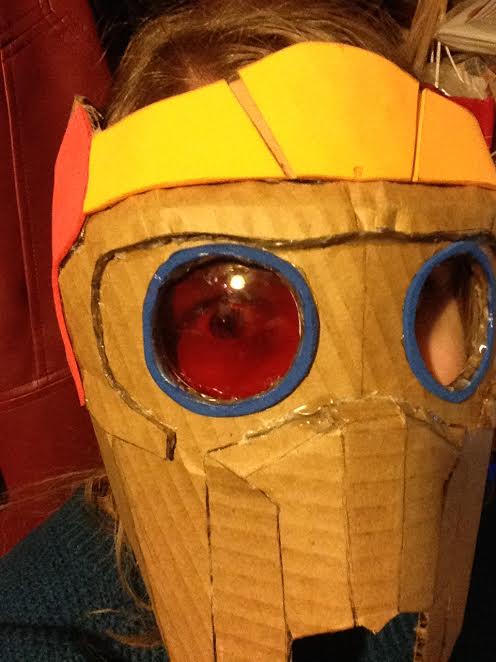
Putting in the lenses can prove to be a bit difficult depending. My eye holes were not exact circles like my lenses so I had to improvise some edging with hot glue and then I colored it with red sharpie so that it would blend. It’s a small thing that you can’t really see unless you look for it.
LET THERE BE LIGHT!
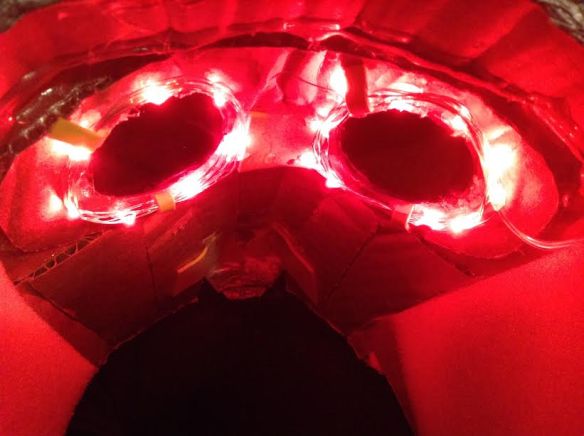
Ugly interior shot, but it let’s you see how bright things are on the inside. Eye shields are necessary! Also foam padding for meh head.
Adding the lights was one of my favorite steps, it seemed to give my helmet a new stage of life, one that I was proud to have done. It’s really the little details that build up to an awesome finished prop.
But really after doing this, you’re done! CONGRATULATIONS.
End Method
So how did it come out? Is it what you hoped it would be? Is it better?
I honestly didn’t have high hopes for mine, I thought I would end up messing up badly halfway through and then end up caving in and buying one of the expensive ones. I didn’t and saved myself a lot of money in doing so. I also can look at my helmet and beam with pride because I know that I built this thing from scratch.
Since I had materials and such saved up, I only ended up spending about $35 on this build. This was to get the LEDs, the silver spray paint, a gold paint, the straws, the hair rollers, and the red lens sunglasses. Which makes it one of my cheapest but most intricate props.
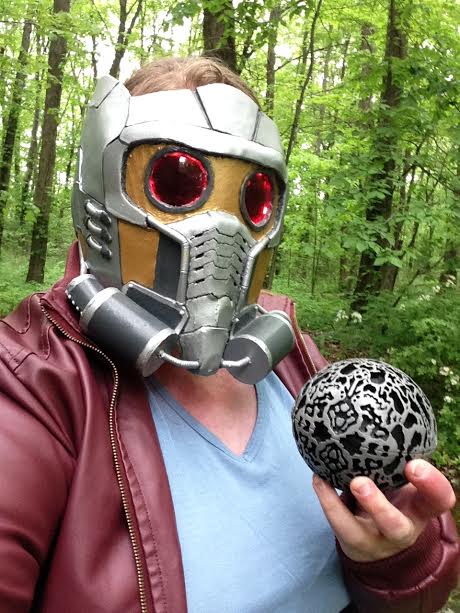
Infinity orb was 3-D printed by @arcmatter on Instagram – I painted it 🙂
Let me know if you have any questions, comments or concerns. Also let me see your helmet if you happen to use this as a reference! Or just let me see your Star Lord cosplay because I freaking love this character.
Find me on tumblr and instagram as annamaecosplay.
Good luck! You’re now equipped with more than 12% of a plan for your helmet 🙂
~Anna
I’m super awful at updating, oh lord. But I’ve been working on a lot of things lately, increasing my skills and realizing the mistakes I made in the past haha! It’s amazing when you can look back and realize the growth you’ve undergone.
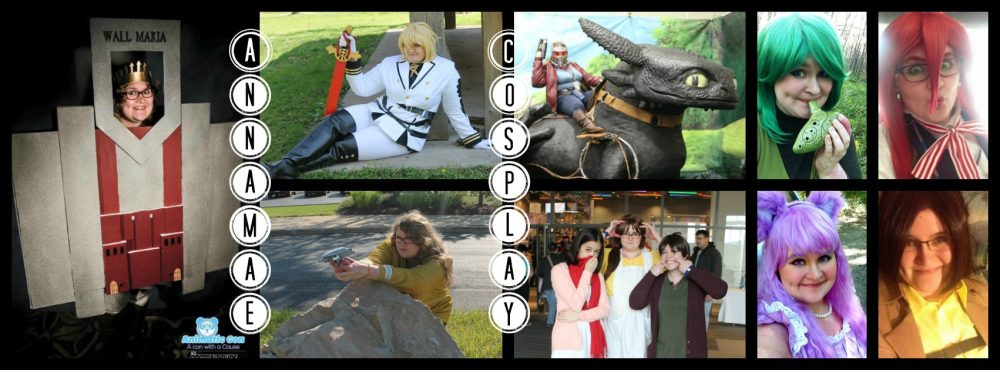
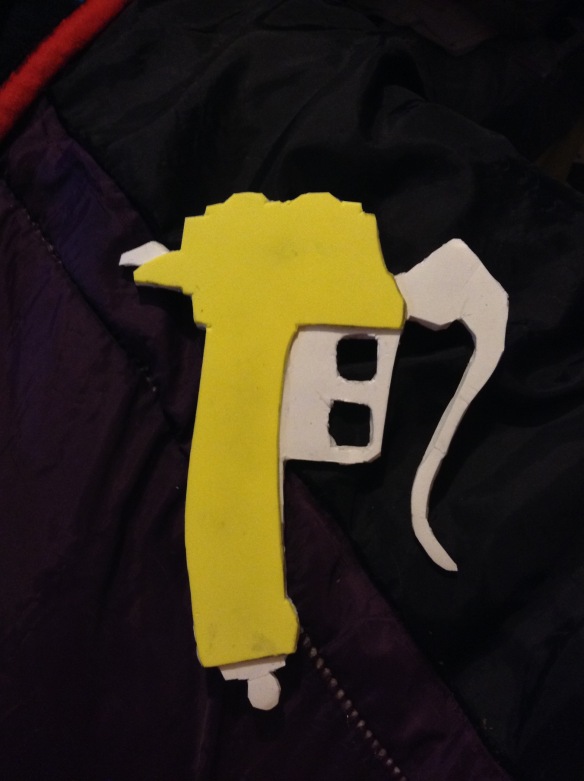
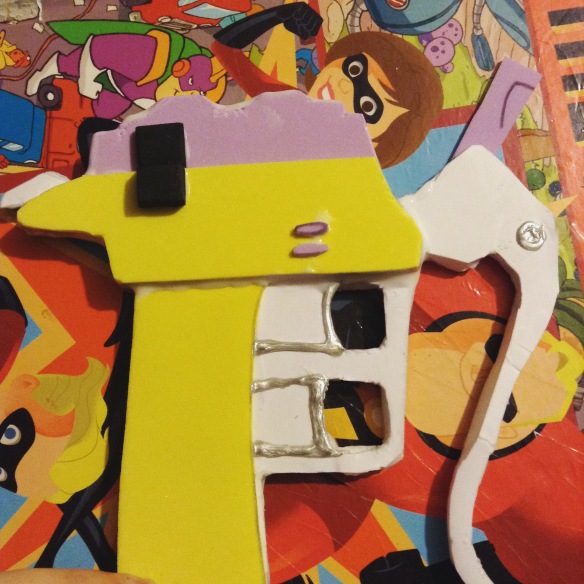
My most recent and honestly successful quests was that of Star Lord from Guardians of the Galaxy. I found myself a Walkman, acquired the headphones, built myself a helmet and got dancing around. The response I’ve had from my shenanigans as Star Lord – or Star Lady as I’m calling it – has honestly blown me away. So much love, quite a few pictures, and so much support as I dance around. To date, this is the cosplay I have the most props for; including two blasters, an infinity orb that was 3-D printed by my friend, my helmet, the Walkman, my headphones, and soon the purple infinity stone and a baby Groot figure. It’s also my favorite cosplay to date.
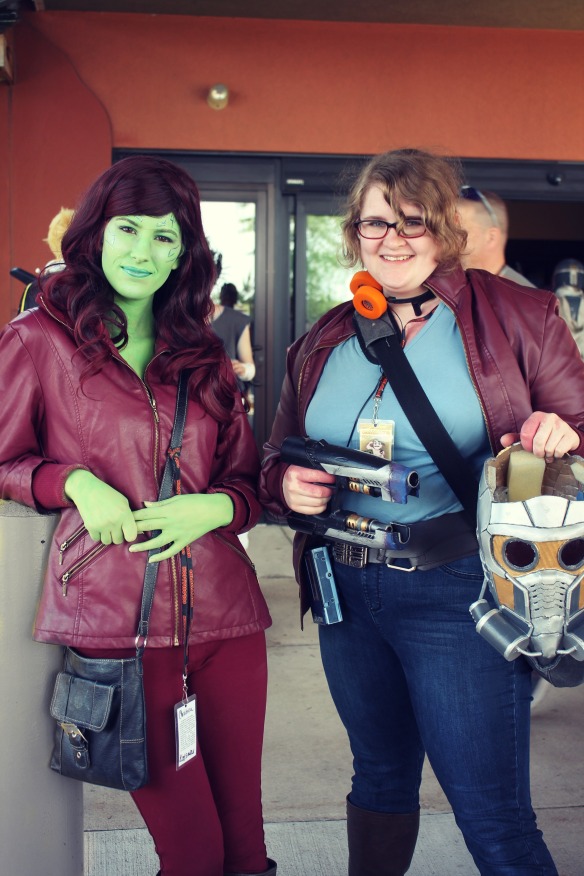
Here I am posing with a lovely Gamora I found at ColossalCon this year 😀 – she is @c_katsaras on Instagram.
I’ll be working on a tutorial here soon for the helmet because I’ve had some people ask for one. It’s really not such a complicated design but I did a cheap route for those who wish to make their own 🙂
Anyways, in other news, I am gearing up to start college this fall, but am also getting close to joining the 501st as a Jawa which shall be quite the experience 🙂
Have a good day everyone!
~Anna
I’ve not been leading a terribly exciting life right now haha! I’ve been working at work more than working on cosplay unfortunately but such is life. Though that doesn’t mean I haven’t been cosplaying or totally inactive.
My next two cons for this year will be Matsuricon coming up here in August and then the Cincinnati Comic Expo again in September. This will be my first experience at Matsuri, so I have no clue what to expect. Hopefully it will be an okay time. Cincy Comic Expo is always an enjoyable time, so I look forward to it as I do every year.
I’ve also been contemplating working more on the YouTube channel I have and never use! So I’ll decide on that and post more when I do 😉
That’s it for now – stay sweet everyone!
Anna
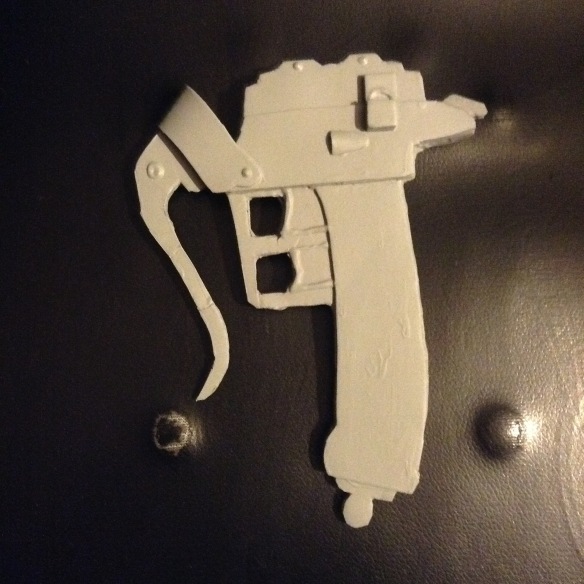
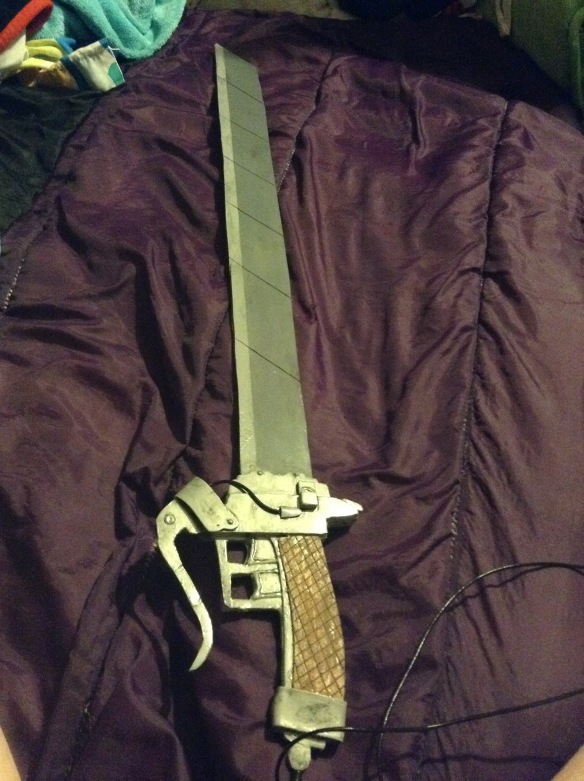
After much deliberation, I’ve decided to try and write out my method for creating the well known hand blades (exacto knives) from Attack on Titan / Shingeki no Kyojin. I wanted to make something that was cheap, easy but still held up pretty well (all things considered) and I would say they came out looking pretty good.
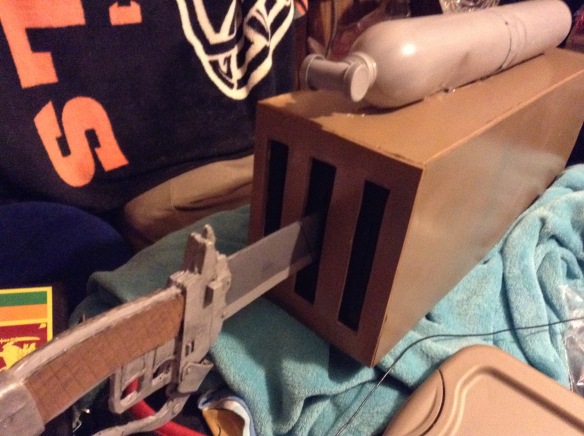
Here’s a look at the gear I made in about the span of two weeks for the Cincinnati Comic Expo of 2015:
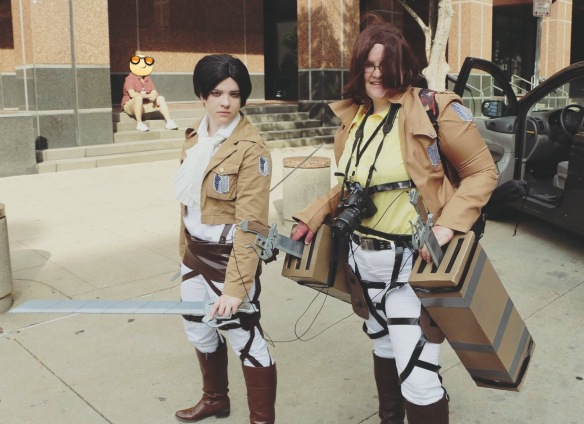
My belts were malfunctioning as I made them out of duct tape and it didn’t hold up at all. I made the gear boxes and blades in the span of about three weeks because I was in con rush mode 🙂 Don’t wait to the last second for your sanity.
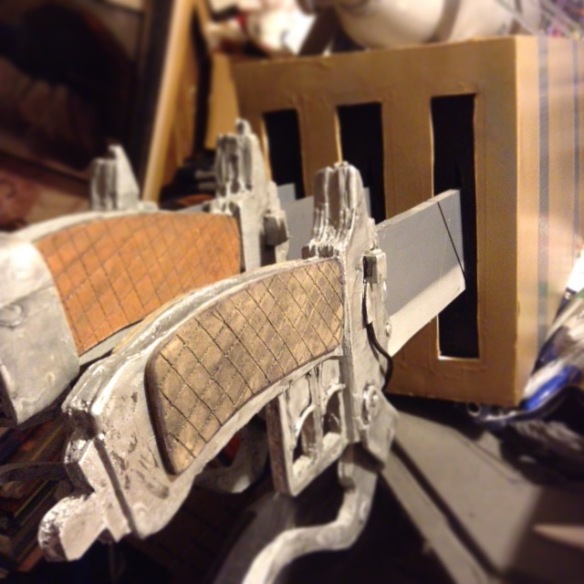
Here’s a close-up of the blade itself:
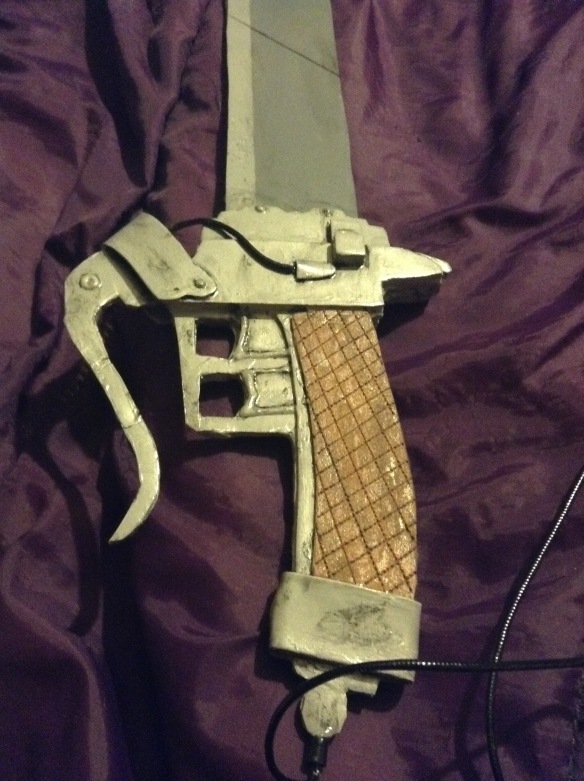
Pardon the odd lighting, most of these were taken on my iPod.
So if my design has peaked your interest, here’s a list of the materials I used. Now, please note, you don’t have to use everything I did but if you want to, then that’s what the list is for I suppose!
Supplies:
Okay now, if you’re like I was…. I had no idea what I was doing. Honest and truly. This was pretty much my first big prop build and it was stressful and I was really questioning myself during the whole thing. But the end result was so highly praised by fellow fans, my family and my friends and I was so proud of the end result that I cried. I say to you, experiment. It’s okay to make mistakes, we all do it. And you can always get more material, even if your wallet doesn’t agree with you. Patience is key!
Also after having done things this way, I would say that in order to make things more sturdy, double up on the blade pieces and handle pieces. IE: So for your left hand, cut out two handle base shapes and sandwich them together, same for the blades.
Method:
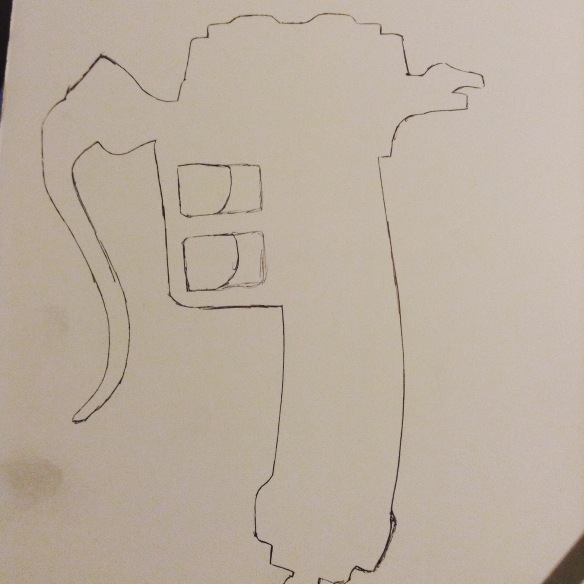
Reference images! You need to know what it looks like and what your general goal is. Something I did, was I found a picture that someone had taken of the handle they had made and I blew it up in Microsoft word, printed it, cut it out, and used it as my stencil. As seen below:
CREDIT GOES TO THE BEAUTIFUL PERSON WHOSE HANDLE I USED FOR REFERENCE! I LOVE YOU!
Tracing! This is kind of self explanatory, really.
Cutting! For the love of all that is holy, take your time doing this! I made a set of test handles so I could familiarize myself with how the foam board would cut and what parts I should cut when so as not to bend or damage anything [this is incredibly important when cutting around the bicycle handle part as well as the finger grips, mistakes were made by me the first time around].
Also make sure you are always cutting straight down. This is hard for me to do to be honest. If you start going at angles, the cut beneath obviously is going to be curved inwards and this can cause issues later. This is why I recommend the test set!
Interlude! No, really. I was so excited to have a handle shape cut out that I literally just ran around my house with them in my hands. This is fine, small victories count for everything.
ALSO!!! Incredibly handy little hint for later: before you do anything, trace around the top of the handle where the blade will connect at the bottom of a part of the foam board so you can use that for the bottom of the blade pieces we will draw out later. Trust me, it makes your life easier. Also label which handle it was drawn around [subtle differences are expected between the handles – I chose which would be my left handed one and my right depending on which felt better on which hand. Decide this and label things accordingly].
Quick seal! This is an optional step, honestly. After I had my foam board handles cut out, I realized the edges were kind of misbehaving. So I did the Elmer’s school glue all around the edge so as to seal it up a bit. It worked well and things went a bit smoother. Not necessary, just something I did.
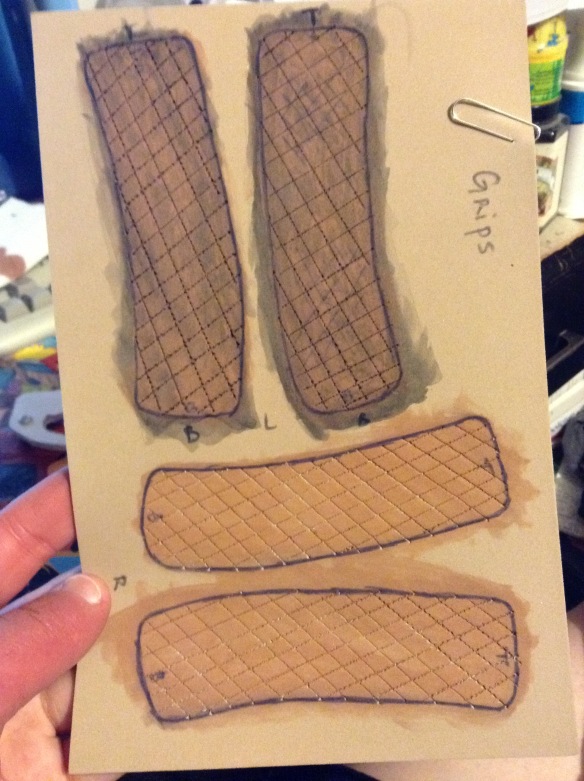
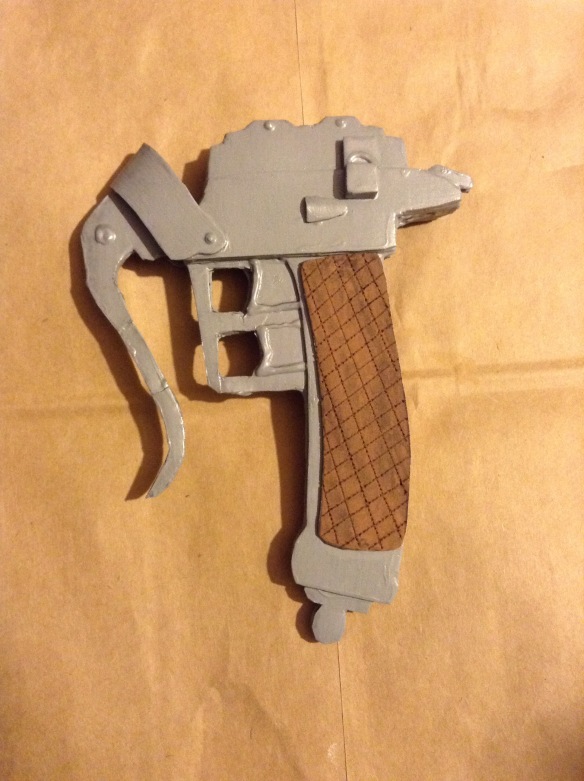
Side quest – grips! While I waited for my handle edges to dry, I began some work on the leather grip part of the handle itself. I am actually pretty happy with the result I had. First thing I did was found a brown piece of the EVA foam sheets. I traced my pattern shape [thanks to my paper cut out] and labeled each. This is how they looked at this point:
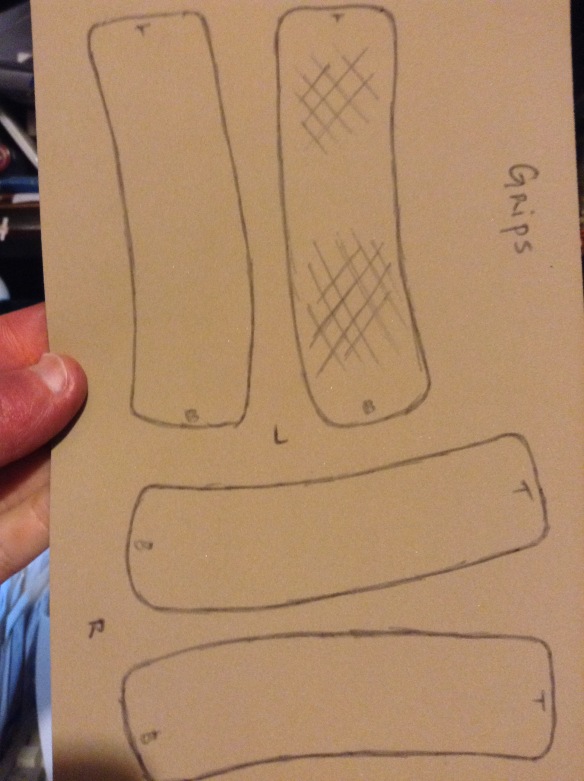
Experience note: don’t write the letters on the piece itself, the pen was still a bit visible even after the painting I did.
The next thing I did was I took a push pin and a ruler and dug intersecting lines into the foam. This actually worked really well, especially when it came to the weathering. I just did the spacing randomly, though you could easily measure everything out. The trick when ‘drawing’ the lines is to make sure you press down hard enough to leave a pretty good indent without piercing through the foam piece.
After this, I did a light layer of a brown/tan paint I had laying around to make the color more vibrant. It looked nice. Then I did a watered down black to make it look weathered. I pretty much did it until it came out in a way that I was pleased. This is how the pieces looked at this point:
Experience note: cut out these pieces before doing brown and black paint, or go back and make sure the thin sides are also colored. I failed to do this and it bugged me.
After the weathering is done, these grips won’t need anything done until they’re mounted on the almost finished product! Quick and easy 🙂
Building up the details! This is honestly the part that takes the longest and that is perhaps partly because I was trying to get things to a golden level of perfect. Just do your best and play with things to get a personalized feel for the handles. I kept using my little paper cut-out to help me get the shapes and such, it’s wonderful to have references here because there are a lot of different designs for the handles, I tried to do a composite of all of them. Small scissors will be your friend in the gluing/trimming stage.
I was probably only making things worse because I used the school glue to paste each EVA foam layer I did. While the sealing was amazing, it took long to dry and was kind of a pain honestly. This layering effect, building up the foam layers and details, helps strengthen the handle tremendously. I also began using the fabric paint to do some raised detailing that I felt couldn’t be done with foam pieces.
Those black little squares are the thicker EVA foam I used, foam board could just as easily be used but probably wouldn’t be as clean cut at the edges. Also the purple foam piece is the whole top half, then I did another yellow layer and then the purple dials.
Now if you notice, depending on which hand it is, the outside of the handle is the side that has the gas line. The inside side featured these two little slide buttons, which were used for some kind of control with the mechanics. Those little pieces are necessary but add a cool effect. The side that has the gas line, I did a little ice cream cone shape and bent it so that it was elevated off the main piece and made a tiny arch where I could connect my cord into [see later reference pic to see what I mean].
This is all mostly a do it how you feel process. I wanted mine to look like they jumped off the pages of the manga and so I did a lot of detailing.

If there’s one thing I’m glad I added, it is that pink piece! Really helped things but I don’t know why.
Do all the detailing that your heart desires! You can go above and beyond what I did, or do things your own way. Experiment and have fun!
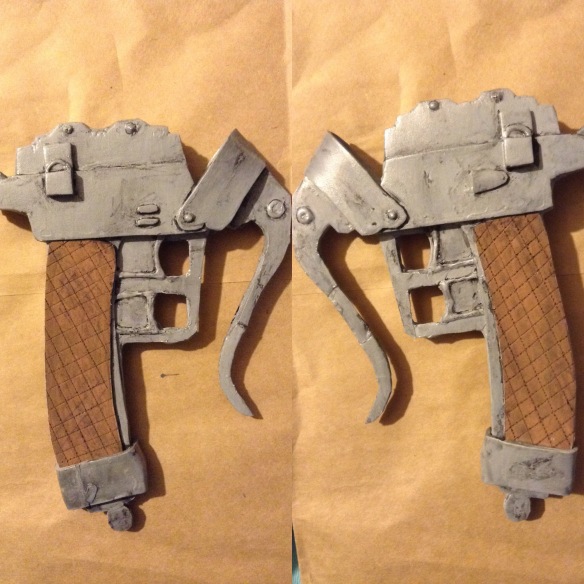
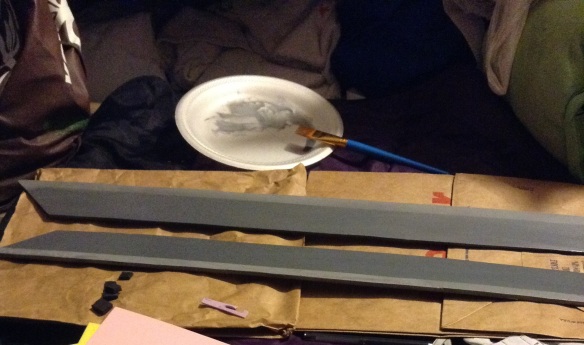
Sealing the foam! I cannot stress enough the importance of this! If you just go out and do your plain gray primer coat, the foam will look leathery instead of shiny. You need to seal it to give it a more metallic look. I literally poured out wood glue on a Styrofoam plate and painted it over everything. Usually they tell you to water it down, I did initially and then realized the end result was ultimately the same soooo, yeah do as you will. Just seal it somehow!
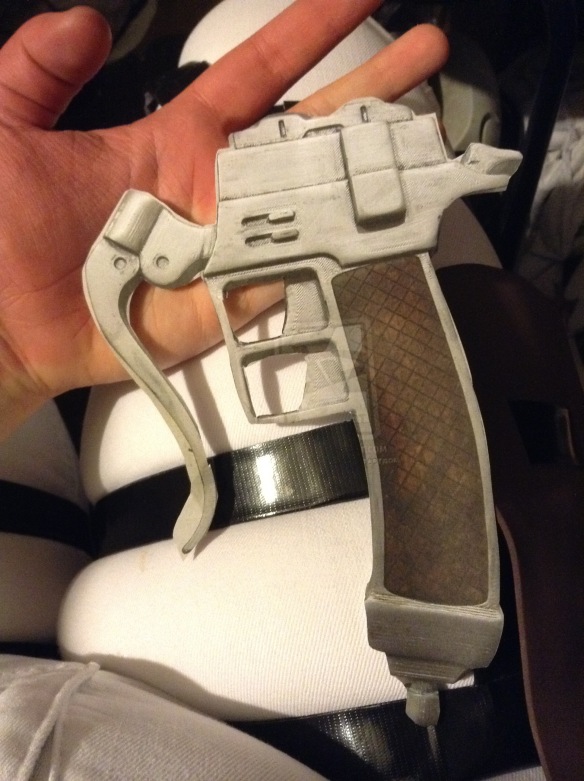
PAINTING!!! My favorite step, getting to bring all those multicolored foam layers together to make something great. I kept looking at my handles and loving them, but once I had that single color painted on, things became epic. This is where I used that Tonic regular gray primer coat. It’s a base color for the rest of things.
Here you can see the little cone shape thing I did for the gas line, this is my left hand handle.
I spray painted this, so make sure you have proper ventilation and safety stuff. Make sure you get all the nooks and crannies too! We need it all gray. Once it is dry, feel free to attach your grips. I got smarter by this point and hot glued those on. Also this is where that delightful metallic paint comes in handy and really makes that base gray coat look metallic as its name suggests. That was another Walmart find – FolkArt 662E Sterling Silver metallic paint.
Really that paint is a form of clear coat and boy does it work wonders.
Look at how much that matte gray primer coat has changed just with that metallic coating!
Now you can get playing with weathering. This was a fun experiment for me as I had never really done any kind of weathering before. I think it came out alright. I just randomly dabbed black paint around and then wiped a lot of it off with a paper towel. EXPERIMENT with it!
Also, know that you don’t HAVE to do any kind of weathering. If you like it being shiny as it was, feel free to leave it that way! I wanted mine to look like they had been used and were in action. So I weathered things.
Fully weathered left hand handle – both sides. I also decided to add a piece that wrapped around the base of the handle, this had a nice effect. I recommend it.
Don’t be afraid if you rub off some of the shiny metallic effect during this part, you can lightly reapply it as you wish to.
Now, by this point, I was bubbling with excitement and pride. Once the detailing was done, painting really brought it together. Happy dances are perfectly acceptable.
The blades! Unfortunately, I don’t have any pictures for this part really. Which I regret. So prepare for some reading!
Okay so if you noted before, I advised you to trace around the part where the blade will attach. I did this for my left handle but not for the right and that was dumb. I should have done this step for both. It really helps when it comes to attaching the blade pieces to the handles.
Using that traced part, you can pretty easily draw out the blade shape. I think my blade length came out to like 23 inches.
Now, here comes a little part that I was miffed by. The shape of the blade is always shown with a slanted tip. Though, after much searching, I discovered that the direction it slants is different. Sometimes the blade edge is the longer part and sometimes the blunt edge is longer. I searched the manga pages too, same story. So I just decided it made more sense for the sharpened edge to be longer. The sharp side of the blade will be on the same side as the bicycle handle part of the handle, too [reference images – they’re important].
So anyways, after that shenanigans, go ahead and cut out the pieces. Take it slow to ensure the edge is as straight as you can get it. After that, you can seal the edges like you did when you first cut the handle out (if you did), or you can jump right into painting.
I decided I wanted the blade edge of the sword to be more visible so I painted that edge a lighter gray. Then after it had dried, I covered it up and painted the rest of the blade using a darker gray [Rust-oleum flat gray primer in my case]. Or you can do it the other way, doing the dark gray first and then the light gray edge. After it all dried, I did more of that metallic paint to shiny it up:
I also decided I wanted to have the lines on it, so I drew them out with a black sharpie and ruler. It was quick and easy and looked pretty good. Another thing I did was very light weathering on them to make them look a bit used. I didn’t do this on the set for my cousin and it still looked good. So again; optional weathering!
Attaching the blades! Really, there probably is another easier way to do this… but hey. I’m a novice at this kind of stuff haha!
What I did was I used the ball pins to attach the blades to the handles. I dug the ball piece into the foamy core of the handle so I had a nice little needle sticking upwards. I did this twice one on each ridge at the top of the handle. Then I coated the pin part in super glue and hot glue and slid it into the foamy core of the blade piece. Potentially you could also use thin kabob sticks or long toothpicks.
I also hot glued all the way around where the blade met the handle to make it more sturdy. Admittedly this was still a point of weakness which I am trying to overcome in my future designs.
Otherwise, if you figure out something that works better, do it. Trust yourself and your gut if you have an idea. Worst comes to worst, you can fine tune it later.
Gas lines! This goes hand in hand with detailing as this step isn’t necessary but adds for a cool effect. You can use pipe cleaner or bracelet/necklace cording for this.
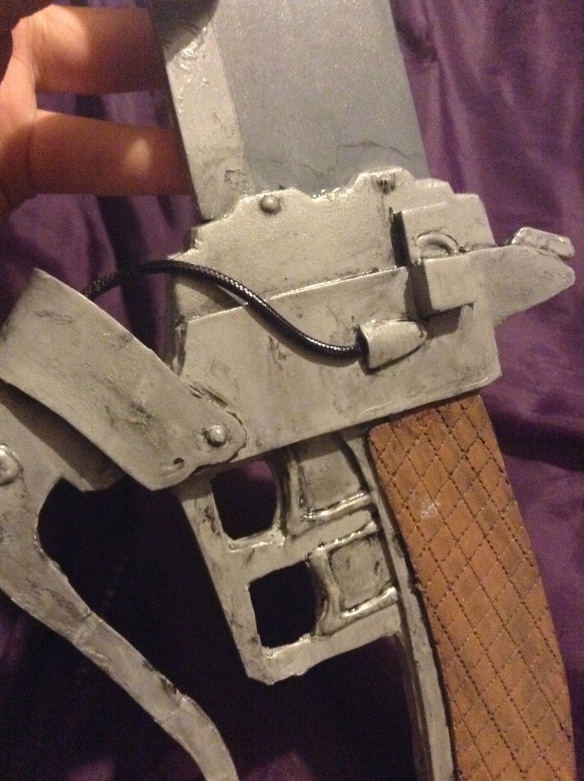
I coated the end with super glue and then stuck it under the little ice cream cone shaped piece. Then for the other end, I attached it to a ball pin, wrapped a tiny piece of black electrical tape around it and shoved it into the foamy core of the bicycle handle. This worked surprisingly well.
I also had a long ling running from the bottom of my handle to my side gear which, again, is optional. Definitely looked cool though.
Clear coating! The official sign that you’re finished – the final clear coating. I did it over everything once I was happy with it, even the brown grip piece, though lightly. Still made for a leathery effect but also protected it.
One way I told the difference between my handles and my cousin’s was I skipped the brown paint part on the grips and instead just weathered it with the black. Both ways looked really sharp.
End Method
So?! How did it come out!? Hopefully things went decently and you got the end result you wanted. I am not claiming to be good at this by any means, or that my method is the best.. but I thought that it might help someone out there.
Occasionally I stressed myself out but god this was fun to do. Which is why I am actually planning to do this again and better my method. I want them sturdier and even better looking!
Thanks for reading! Hope this helped someone 🙂
If you decide to use my method, send me questions or progress pics! You can do that via instagram (@annamaecosplay) or message me on my Facebook page (Anna Mae Cosplay).
-Anna
P.S. Excuse any typos haha – if I see them I will correct them.
After a long and unexpected hiatus from these drabbles (okay I forgot I had this)… I have come back! Many things have happened since last I wrote, along with several new cosplays!
My convention schedule this year will be bouncing around quite a bit with quite a few cons! Including some new ones!! We may add to this list, but I will have to see.
I have definitely expanded my wardrobe of cosplays! And I am also still working on finishing some of my cosplays as well as I never seem to finish them… The fault it all mine. Here’s some that accumulated in the past year or so:
Now to move on to the ones I’m still piecing together from last year! Including a big project that I am excited to finish!
I suppose that’s all the news for now.. Felt like a lot more. I have much more planned and honestly too many cosplays in mind to do. With the start of one, comes the ideas for five others. I’m trying to limit myself but I just can’t. This year may bring change so we will have to see how much I can accomplish. I am excited for the possibilities however!
Until next time,
Anna
This was my first ever time going to Colossalcon, which is held at the Kalahari Resort in Sandusky, OH, and I have to say that it was a fantastic time. I came away from this con with some wonderful memories, awesome goodies and a generalized good attitude.
The ride up was long and boring, but once we got to our hotel and were in the hype of the weekend, things immediately got awesome. We dressed light for Thursday, knowing it would mostly be people just arriving and getting their badges, settling into the hotels and whatnot. It was still fun and we got a general idea as to what was in store for us. Stepping into that Dealer’s Room for the first time was equal to walking into a geeky paradise. The Game Room was equivalent to heaven.
Friday and Saturday of the con were by far the busiest but exciting and entertaining all the same. Although there were times when the crowd flow was rather slow and kind of draining. But that can be said for all conventions. I do know this though, we had a ball of fun the whole weekend and we never once ventured to the petting zoo or the waterpark. We spent the entirety of our time in the convention center or just outside in photo shoots. Sunday we had out concert with the Symphonic Anime Orchestra which was so fun to be a part of. I really, really enjoyed being a part of that. I cannot wait to rejoin them for the Cincinnati Comic Expo this year.
Anyways, I highly recommend this convention, it was awesome and I will definitely be returning next year! Hopefully with more money to blow…… oops.
Until next time!
Anna
Haven’t written in awhile because I was incredibly busy!
This past Sunday (4/26) I ventured to my first ever steampunk convention or should I say symposium. It was incredible and I have fallen in love with the style, the people and basically steampunk haha I definitely plan to venture back next year, this time in a better costume. Btw: Check out Frenchy and the Punk on youtube, heard them and fell in love.
As far as cosplays go, well progress is kinda slow honestly. Due to work and other things, I fell a bit behind. But that’s okay because I still feel I can finish everything before ColossalCon! I can’t wait to be there, first time at Colossal!
Robin is like 88% done, I still need to finish the pants and the belt thing. I have two tomes made, Bolganone [fire] and Thoron [thunder/lightning], and in the process of building a Levin sword, who knows if I’ll finish it in time or not.
Assassin’s Journey will be what I work on a lot. I still have so much stuff to do with it ._. But I will work on it tomorrow while I have off from work so hopefully much progress can be made. I am optimistic.
The merchant merely needs to be pieced together 🙂
As far as my upcoming projects, well, I hope to start on a character called Pacifica Casull from Scrapped Princess and then I’m definitely starting of Verzamelaar which is a rendition of Journey made by the lovely ArcaneAvis (Jeanette Ely) on deviantart. I got her permission to make that one and I don’t intend to disappoint! A steampunk costume will be in there somewhere I’m sure.
That’s all I got for now, until the next time!
In many ways the one curse all of us cosplayers share is the curse called waiting. Patience, they say is a virtue. One that I sometimes have and yet most times do not. Whether it be waiting for an order to come in your mail, waiting for something to ship, waiting for a certain material to get back in stock, waiting to have the funds to feed your habits, waiting for convention time, waiting in line for something at a convention or any other various types of waiting; we all know the feels.
I am feeling the full brunt of this curse at current. I am waiting for this craft store to get craft foam back in stock, waiting for something to come in the mail for one of my costumes as well as waiting for my funds to raise some. SIIIIGGGHHHHH
Of course in the meantime I have family events, crafting, my kitties and work to distract me from the waiting but goodness I am feeling it. I am eager for convention time to come about as well as quite eager for my costume pieces to arrive. IT’S A CURSE I TELL YOU!!!
Patience is a virtue that I don’t currently have!
—
On a completely different note, a friend of mine has invited me to accompany her to a local steampunk convention in April which I am excited for. It looks like it will be interesting to say the very least. I have always enjoyed various steampunk pieces of art so I feel it will be a treat. Now to get some kind of costume together… seems like I’m doing that quite a lot recently.
ONTO CRAFTING WE GO! Now if only I didn’t have to wait so freaking long for things!! Good things come to those who wait, they say. I want to believe them but goodness is the wait hard.
As stated before I have already purchased my pass for ColossalCon in June (4-7) which I am way excited for! I am still working out the specifics on which days I’m cosplaying what but I do know what I’m bringing and such. Here is tentative schedule:
Thursday – Red Journey Wanderer (Journey 2012)
Friday – The Merchant (OC – original character)
Saturday – Robin/Avatar (Fire Emblem: Awakening / Super Smash Bros Wii U)
Sunday – Assassin’s Journey (OC – Assassin’s Creed x Journey 2012)
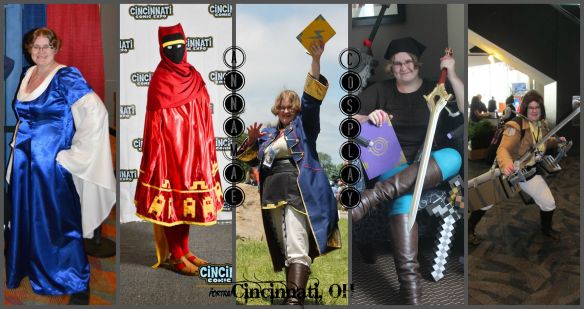
Also I can say that I have already gotten my VIP pass to the Cincinnati Comic Expo in September (18-20). I went to that convention last year, it was actually my very first, and I immediately fell in love. I shall frequent that convention in the coming years in honor of my first experience and my hometown. Especially since they keep bringing Doctor Who stars!
I am excited for the future, I may try and venture to another odd convention here or there, we shall see. I really want to go to NyanCon this year, here’s hoping! Maybe by next year I can venture to one of the REALLY big cons like Anime Central or Youmacon, maybe even Setsucon. I will slowly but surely make my way around and I cannot wait until I am officially con-hopping. Better yet once I get more cosplays that maybe I become better known for. HERE’S HOPING!
Keep it sweet, peeps.
